Android Mini User System
January 24, 2017

Android Users
The following user tutorials assume that you have android studio, and that you are able to create blank activities with some buttons and textviews, the easy stuff, nothing else!
Post Contents
1. Overview
2. Android Setup
3. Wiring Activities
4. Android Networking with AsyncTask
1. Overview
In this post we’ll take a look at the skeleton for user sign up and login on android. We’ll have three activities in this tutorial. One will be your generic mainActivity (figure 1). This is the activity users will see if the app detects the user has already logged in. The next two activities will just have forms for login and signup (figures 2 & 3 respectively).
On the backend, we will use flask, because it’s easiest way to convey the security topics that will be covered (And I don’t know PHP). We’ll end up having three routes, one for sign up, login, and then a route for testing our implementation out.
The client server interaction with the app will look something like the following diagram:
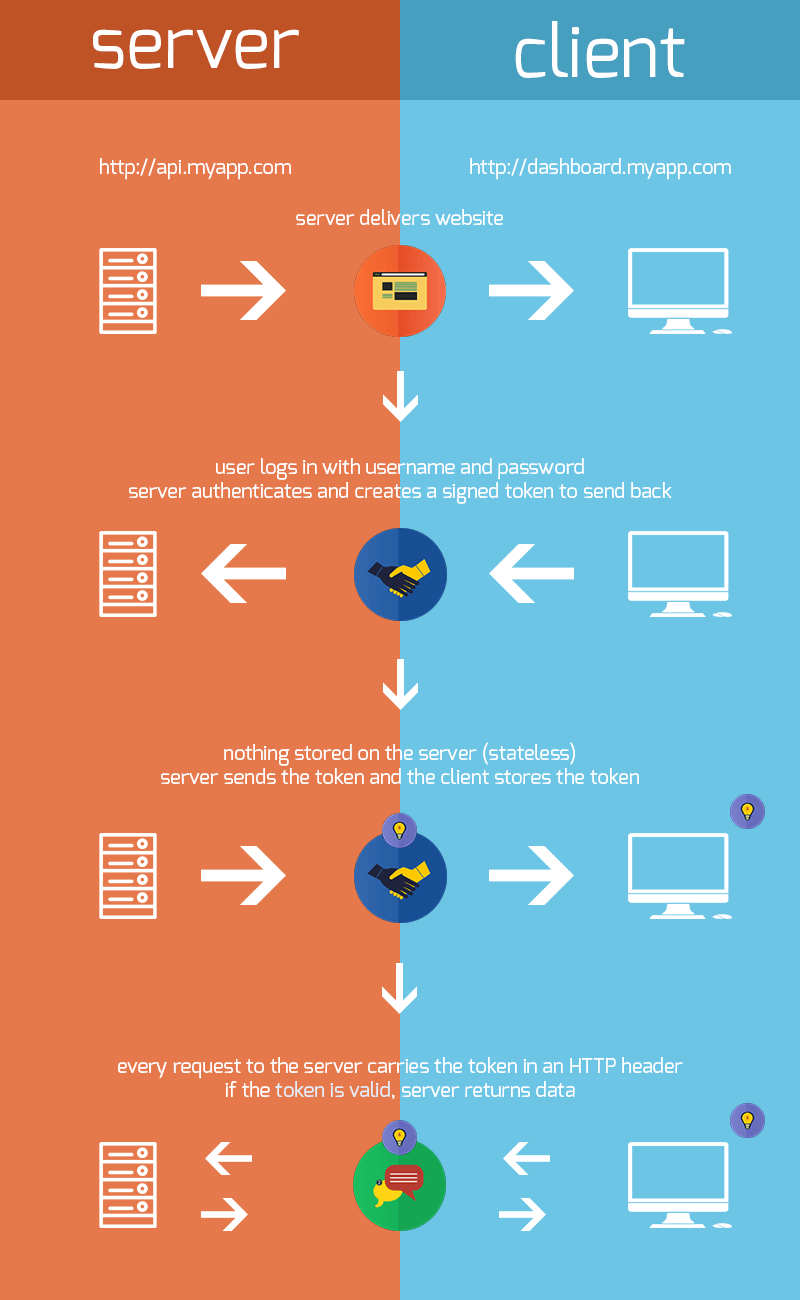
As a caveat, this post isn’t meant to set up the entire OAuth token based authentication specification. That is, this post WILL NOT cover things like timing out an authentication token to avoid long term exploits. However, it will clear up some of the networking topics to help you build out a full fledged solution. Let’s get to it!
2. Android Setup
First you will want to create the activities as shown in figures 1, 2, and 3 with the buttons and edittexts as they are shown. Note that the text for ‘sign up’ is actually a textview with a listener that changes the activity to the sign up activity.
Now that we have our layouts, the goal of this tutorial should be pretty straight forward. We want to store users in a database when they sign up, and we want to be able to access that database to see if an account is available when a user logs in. Simple! However, let’s wire up the rest of the android client first. First we will need a user class. Something simple would suffice:
public class User {

    private String email;
    private String phone;
    private String firstName;
    private String lastName;

    private static User currentUser;

    public static void setCurrentUser(User user) {
        currentUser = user;
    }

    public static User getCurrentUser() {
        return currentUser;
    }

    public static boolean isLoggedIn(Context context) {
        SharedPreferences prefs = PreferenceManager.getDefaultSharedPreferences(context);
        if(prefs.getString(SharedPreferenceConstants.AUTH_TOKEN, "").equals("")){
            return false;
        }

        return currentUser != null;
    }

    public static void logout(Context context) {
        setCurrentUser(null);

        SharedPreferences prefs = PreferenceManager.getDefaultSharedPreferences(context);
        SharedPreferences.Editor editor = prefs.edit();
        editor.putString(SharedPreferenceConstants.AUTH_TOKEN, "");
        editor.apply();
    }

    public User(String email, String phone, String firstName, String lastName, String authToken) {
        this.email = email;
        this.phone = phone;
        this.firstName = firstName;
        this.lastName = lastName;
    }

    public String getEmail() {
        return email;
    }

    public void setEmail(String email) {
        this.email = email;
    }

    public String getPhone() {
        return phone;
    }

    public void setPhone(String phone) {
        this.phone = phone;
    }

    public String getFirstName() {
        return firstName;
    }

    public void setFirstName(String firstName) {
        this.firstName = firstName;
    }

    public String getLastName() {
        return lastName;
    }

    public void setLastName(String lastName) {
        this.lastName = lastName;
    }

}
*note the static methods are just for the convenience of getting the user info of whoever is logged in
The break down for this code is pretty straight forward. We will be storing our auth token in shared preferences when a valid user logs in and the server gives us that auth token. However, Google has provided a class called ‘AccountManager’ where this should be stored to avoid exploits, but wheres the fun in that, amirite? Of course, I’m kidding, and after this tutorial, once you understand why tokens work, and how to deal with them, then you can scale out your app by taking advantage of cool things like AccountManager.
As a final step in the setup, we need to allow our app to access the network for our HTTP requests, so add the following permission:
<uses-permission android:name="android.permission.INTERNET" />
3. Wiring Android Activities
Great job so far! A few more basics still need to be covered before we can move on to networking.
We want to have all our forms and buttons work for our three activities. For the blank main activity, all we need is the following, since it does nothing:
public class MainActivity extends AppCompatActivity {

    private User currentUser;

    @Override
    protected void onCreate(Bundle savedInstanceState) {
        super.onCreate(savedInstanceState);
        setContentView(R.layout.activity_main);

        if(!User.isLoggedIn(getApplicationContext())){
            Intent loginIntent = new Intent(this, LoginActivity.class);
            this.startActivity(loginIntent);
            finish();
        }
        currentUser = User.getCurrentUser();
    }

}
EASY PEEEZI
Note how we save the app some processing time by checking if the user is logged in, and if it is, we skip going to the login activity. This is good for battery life.
Speaking of the login activity. Here’s what it should end up looking like in code:
public class LoginActivity extends AppCompatActivity implements View.OnClickListener, LoginActivityInteraction {

    private EditText password, email;
    private TextView signupLink;
    private Button loginButton;
    private SharedPreferences prefs;
    private UserLoginTask userLoginTask;

    @Override
    protected void onCreate(Bundle savedInstanceState) {
        super.onCreate(savedInstanceState);
        setContentView(R.layout.activity_login);

        prefs = PreferenceManager.getDefaultSharedPreferences(getApplicationContext());
        loginButton = (Button)findViewById(R.id.button);
        loginButton.setOnClickListener(this);
        signupLink = (TextView)findViewById(R.id.signupLink);
        signupLink.setOnClickListener(this);

        password = (EditText)findViewById(R.id.password);
        email = (EditText)findViewById(R.id.username);
    }

    @Override
    public void onClick(View v) {
        if(v.equals(loginButton)){

            String usernameStr = email.getText().toString();
            String passwordStr = password.getText().toString();

            userLoginTask = new UserLoginTask(this);
            userLoginTask.execute(usernameStr, passwordStr);
        }else if(v.equals(signupLink)){
            Intent intent = new Intent(this, SignupActivity.class);
            this.startActivity(intent);
        }
    }

    @Override
    public void loginStatusUpdate(JSONObject reqResult) {
        try {
            if(userLoginTask.isCancelled() || ((int) reqResult.get(NetworkConstants.RESULT_STATUS_CODE)) != HttpURLConnection.HTTP_OK){
                Toast toast = Toast.makeText(getApplicationContext(),
                        "something went wrong, please sign up again",
                        Toast.LENGTH_SHORT);
                toast.show();
            }else if(((int)reqResult.get(NetworkConstants.RESULT_STATUS_CODE)) == HttpURLConnection.HTTP_OK){
                Intent intent = new Intent(this, MainActivity.class);
                this.startActivity(intent);
                finish();
            }
        } catch (JSONException e) {
            e.printStackTrace();
        }
    }

    @Override
    public void loginNetworkingUpdate(Boolean isBusyNetworking) {
        loginButton.setEnabled(!isBusyNetworking);
    }
}
with the following interface used to enforce a state change for when the networking task has completed
public interface LoginActivityInteraction {

    void loginStatusUpdate(JSONObject reqResult);
    void loginNetworkingUpdate(Boolean isBusyNetworking);
}
We’ll break down the code after the sign up activity, since both the login activity and sign up activity are practically identical in how they function. That said, let’s see the sign up activity:
public class SignupActivity extends AppCompatActivity implements View.OnClickListener, SignupActivityInteraction {

    private EditText emailEditText, firstNameEditText, lastNameEditText, phoneEditText, passwordEditText;
    private Button signupButton;
    private UserSignupTask signupTask;

    @Override
    protected void onCreate(Bundle savedInstanceState) {
        super.onCreate(savedInstanceState);
        setContentView(R.layout.activity_signup);

        signupButton = (Button)findViewById(R.id.signup_button);
        signupButton.setOnClickListener(this);

        emailEditText = (EditText)findViewById(R.id.signup_email_editText);
        firstNameEditText = (EditText)findViewById(R.id.firstName_editText);
        lastNameEditText = (EditText)findViewById(R.id.lastName_editText);
        phoneEditText = (EditText)findViewById(R.id.signup_phone_editText);
        passwordEditText = (EditText)findViewById(R.id.signup_password_editText);
    }

    @Override
    public void onClick(View v) { //TODO validate the various strings to make sure they aren't junk strings
        if(v.equals(signupButton)){

            String firstName = firstNameEditText.getText().toString();
            String lastName = lastNameEditText.getText().toString();
            String emailStr = emailEditText.getText().toString();
            String phoneStr = phoneEditText.getText().toString();
            String passwordStr = passwordEditText.getText().toString();

            signupTask = new UserSignupTask(this);
            signupTask.execute(firstName, lastName, emailStr, phoneStr, passwordStr);
        }
    }

    @Override
    public void signupStatusUpdate(JSONObject reqResult) {
        try {
            if(signupTask.isCancelled() || ((int) reqResult.get(NetworkConstants.RESULT_STATUS_CODE)) != HttpURLConnection.HTTP_OK){
                Toast toast = Toast.makeText(getApplicationContext(),
                        "something went wrong, please sign up again",
                        Toast.LENGTH_SHORT);
                toast.show();
            }else if(((int)reqResult.get(NetworkConstants.RESULT_STATUS_CODE)) == HttpURLConnection.HTTP_OK){
                Intent intent = new Intent(this, LoginActivity.class);
                this.startActivity(intent);
                finish();
            }
        } catch (JSONException e) {
            e.printStackTrace();
        }
    }

    @Override
    public void signupNetworkingUpdate(boolean isBusyNetworking) {
        signupButton.setEnabled(!isBusyNetworking);
    }
}
Once again, with the following interface used to enforce a state change for when the networking task has completed:
public interface SignupActivityInteraction {

    void signupStatusUpdate(JSONObject status);
    void signupNetworkingUpdate(boolean isBusyNetworking);
}
Now that we have the code down to look at, let’s break down only the signup activity. The login activity is basically identical in its functionality (so much so that both could probably be refactored into a single one) so we’re just going to look at the logic for one.
The onCreate method should be straight forward. We’re just setting up our references to the layout. EASY!
The onClick is slightly more complicated. We check that the view which was clicked was the signup button, and once we do that we get the user’s credentials and pass it into an AsyncTask object like so:
signupTask = new UserSignupTask(this);
signupTask.execute(firstName, lastName, emailStr, phoneStr, passwordStr);
This task will handle the http POST request with the users information to create an account. We’ll take a look at this later.
We needed to implement the two methods from the interface, ‘signupStatusUpdate’ and ‘signupNetworkingUpdate’. The entire point of this was to give the asynctask some methods to call when it has completed or failed the POST request. Let’s look at ‘signupStatusUpdate’ further since ‘signupNetworkingUpdate’ is pretty straightforward:
    @Override
    public void signupStatusUpdate(JSONObject reqResult) {
        try {
            if(signupTask.isCancelled() || ((int) reqResult.get(NetworkConstants.RESULT_STATUS_CODE)) != HttpURLConnection.HTTP_OK){
                Toast toast = Toast.makeText(getApplicationContext(),
                        "something went wrong, please sign up again",
                        Toast.LENGTH_SHORT);
                toast.show();
            }else if(((int)reqResult.get(NetworkConstants.RESULT_STATUS_CODE)) == HttpURLConnection.HTTP_OK){
                Intent intent = new Intent(this, LoginActivity.class);
                this.startActivity(intent);
                finish();
            }
        } catch (JSONException e) {
            e.printStackTrace();
        }
    }
we see that the method is given a JSONObject. What will that contain? This can contain whatever you want the asynctask to send back.
Since all we need to know is whether or not the signup succeeded, that’s exactly what we store, an HTTP_OK code in the JSONObject if the network request succeeded. I’ll admit, in retrospect, this is a bit overengineered for this simple example, but let’s roll with it for now, and if you want to change that, please do so now, but remember to change the code in the asynctask later.
Finally, if the POST request succeeded, then we go back to the login task to have the user login.
1. Android networking with AsyncTask
Now for the last part, we’ll look at the UserSignupTask AsyncTask:
public class UserSignupTask extends AsyncTask<String, Void, JSONObject> {

    private String firstName, lastName, email, phone, password;
    private SignupActivityInteraction activity;
    private JSONObject httpRequestResult;

    public UserSignupTask(Context context) {
        this.activity = (SignupActivityInteraction)context;
    }

    @Override
    protected JSONObject doInBackground(String... params) {
        publishProgress();

        httpRequestResult = new JSONObject();
        try {
            httpRequestResult.put(NetworkConstants.RESULT_STATUS_CODE, -1);
            httpRequestResult.put(NetworkConstants.RESULT_BODY, null);
            httpRequestResult.put(NetworkConstants.RESULT_HEADERS, null);
        } catch (JSONException e) {
            e.printStackTrace();
        }

        this.firstName = params[0];
        this.lastName = params[1];
        this.email = params[2];
        this.phone = params[3];
        this.password = params[4];
        try {
            return postSignupUser();
        } catch (Exception e){
            e.printStackTrace();
            return httpRequestResult;
        }
    }

    private JSONObject postSignupUser() throws IOException{

        InputStream is = null;

        try {
            disableConnectionReuseIfNecessary();
            HttpURLConnection conn = (HttpURLConnection) new URL(NetworkConstants.SIGNUP_URL).openConnection();
            conn.setDoOutput(true);
            conn.setReadTimeout(NetworkConstants.READ_TIMEOUT_MS);
            conn.setConnectTimeout(NetworkConstants.CONNECT_TIMEOUT_MS);
            conn.setRequestProperty("Content-Type", "application/json");
            conn.setRequestProperty("Accept", "application/json");
            conn.setRequestMethod("POST");
            conn.connect();
            JSONObject credentials = new JSONObject();
            credentials.put("firstName", this.firstName);
            credentials.put("lastName", this.lastName);
            credentials.put("email", this.email);
            credentials.put("phone", this.phone);
            credentials.put("password", this.password);
            Writer osw = new OutputStreamWriter(conn.getOutputStream());
            osw.write(credentials.toString());
            osw.flush();
            osw.close();
            final int HttpResultCode = conn.getResponseCode();
            httpRequestResult.put(NetworkConstants.RESULT_STATUS_CODE, HttpResultCode);
            is = HttpResultCode >= 400 ? conn.getErrorStream() : conn.getInputStream();
            Log.d("Signup", "Response code is: " + HttpResultCode);
            if(HttpResultCode == 401){
                Log.d("signup", "auth failure from server!:"+401);
            }
        } catch (Exception e){
            Log.d("signup", "networking failed");
            e.printStackTrace();
        } finally {
            if(is != null){
                is.close();
            }
        }
        return httpRequestResult;
    }


    @Override
    protected void onProgressUpdate(Void... params) {
        activity.signupNetworkingUpdate(true);
    }

    @Override
    protected void onPostExecute(JSONObject result) {
        Log.d("signup", "signup in onPostExecution"+this.getStatus());
        activity.signupNetworkingUpdate(false);
        activity.signupStatusUpdate(result);
    }

    @Override
    protected void onCancelled() {
        activity.signupNetworkingUpdate(false);
        activity.signupStatusUpdate(httpRequestResult);
    }

    private void disableConnectionReuseIfNecessary() {
        // Work around pre-Froyo bugs in HTTP connection reuse.
        if (Build.VERSION.SDK_INT < Build.VERSION_CODES.FROYO) {
            System.setProperty("http.keepAlive", "false");
        }
    }


}
We’re going to break this code down at a high level, since it would be outrageous to go over every object here.
In the doInBackground method, the method which handles the POST request, we use an HttpURLConnection object to create a TCP HTTP connection to our server at the address from our Constants file. We package the user’s credentials in a json object and write it to the server. Now, when we get a response, we’ll return from ‘doInBackground’ the result, which will get passed to ‘onPostExecute’. Here, we enable the signup button via ‘signupNetworkingUpdate’ and then we pass the result to ‘signupStatusUpdate’. If the result was HTTP_OK, then the login activity will be created. That’s it!
As an exercise, this tutorial will not cover the login activity’s loginTask, because it is more challenging and builds directly off of the signup activity’s task. However, here are some questions to direct your implementation:
Recall that the MainActivity checks to see if an auth token is in the shared preferences. Also, recall that the loginStatusUpdate method is basically identical to the signupStatusUpdate method. If that’s the case, then when should we be storing the auth token? In what method of the task will this occur? Aside from receiving an auth token from logging in, what else will we be receiving? How can we use what we presently have coded to encapsulate the other information that we will receive from the POST request to the server with the login info?
Some of these questions will be answered in the following tutorial on the backend portion for our mini user system.