Android Mini User System Serverside
January 25, 2017

Post Contents
1. Overview
2. Server Setup
3. Model Setup
4. sign up
5. Login
6. Checking the Auth
1. Overview
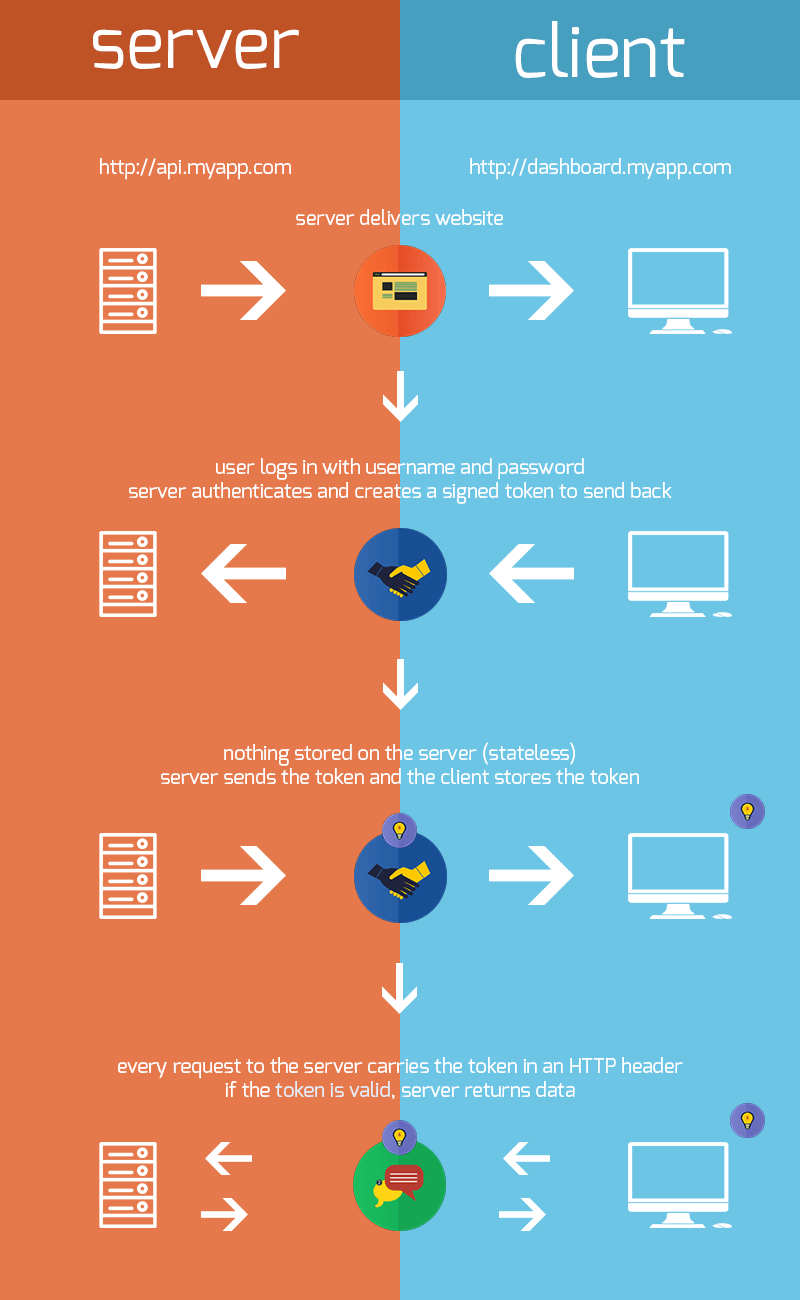
This post will represent the server side portion of the mini user system tutorials. We’ll now build out the server response code necessary to represent the client server interaction diagram we looked at before:
Before we get into the details of the behavior, some security concepts need to be explained. First, I will assume that the reader understands the importance of privacy and security as a developer. With that, two important security measures are discussed for a user system.
The first is the idea of securing user passwords. In order to do this, we will use bcrypt. The salient point to understand about bcrypt is that it creates a secure representation of a password that we can store in a database. If a user logs in, we can compare the login password with the one stored in the database AFTER we transform the given login password using bcrypt again. Once this is done, we don’t have to worry about an attacker getting user passwords**.
The second is the idea of letting the user make requests to the server without having to log in for each request. In order to do this, we will use an authentication token. The salient point to understand about auth tokens is that an auth token is a representation of whether or not the user is who they say they are. That is, we know when a user has an account in our database, AND we know that they are who they say they are if they supply a username and a correct password. Therefore, on login, we can have the server respond with a token that represents those two pieces of knowledge. Subsequent requests will only need to include the token, and not a username and password. Once this is done, we don’t have to worry about attackers pretending to be other people***.
Now that we’ve covered those security ideas, let’s look back at the diagram.
So there are four components to this behavior:
- The server can create a user account on signup 2. The server can handle comparing the user password with the secure database password when a login request occurs. 3. The server can generate a token when it gets a username and password for an existing user 4. The server can check if that token is valid for every request/route that we want to protect from non-users.
With that break down, then we know we need a route for sign up, a route for login, and some logic that ensures request tokens are valid. So, let’s get started!
2. Server setup
Before we really get started we’ll need some tools. We’ll need a machine to test on, flask, pip, and sqlalchemy. You can get a linux box with those tools from digital ocean by following the ‘Setting up Flask linux’ tutorial on this website. Once you have that, the only new tools you’ll need are
pip install pyOpenSSL
pip install cryptography
pip install M2Crypto
pip install bcrypt
pip install pyjwt
for me, there was some dependency issues that may come up. If that’s the case, then feel free to ask one of the club leaders for help during the meetup, but try to see if google helps first.
3. Model Setup
As with previous tutorials, we’ll create a file for our sqlalchemy models. We’ll import this later into our server file. The models will need some of the following components:
Our “models.py” file
from sqlalchemy import Column, ForeignKey, Integer, String
from sqlalchemy.ext.declarative import declarative_base
from sqlalchemy.orm import relationship
from sqlalchemy import create_engine
from sqlalchemy.orm import sessionmaker
import sqlalchemy
import jwt
import datetime

DeclarativeBase = declarative_base()

class Users(DeclarativeBase):

        __tablename__ = 'users'

        id = Column(Integer, primary_key=True)
        first_name = Column(String, nullable=False)
        last_name = Column(String, nullable=False)
        email = Column(String, unique=True)
        phone = Column(String, unique=True)
        password = Column(String, nullable=False)

        def __init__(self, first_name, last_name, email, phone, password):
                self.first_name = first_name
                self.last_name = last_name
                self.email = email
                self.phone = phone
                self.password = password

        def get_dict(self):
                return {self.first_name, self.last_name, self.email, self.phone, self.password}

    #If the auth_token is valid, we get the user id from the sub index of the payload
    def encode_auth_token(self, user_id):
        try:
            #exp=expiration date of token; iat=current time; sub=subject or user name
            payload = {
                    'exp': datetime.datetime.utcnow() + datetime.timedelta(days=1, seconds=5),
                    'iat': datetime.datetime.utcnow(),
                    'sub': user_id
            }
            return jwt.encode(
                    payload,
                    "<YOUR SECRET STRING GOES HERE>",
                    algorithm='HS256'
                )
        except Exception as e:
            return e

    @staticmethod
    def decode_auth_token(auth_token):
        try:
            payload = jwt.decode(auth_token, "<YOUR SECRET STRING GOES HERE>")
            return payload
        except jwt.ExpiredSignatureError:
            return 'Signature expired. Please log in again'
        except jwt.InvalidTokenError:
            return 'Invalid token. Please log in again'

def connect(user, password, db, host='localhost', port=5432):
        url = 'postgresql://{}:{}@{}:{}/{}'
        url = url.format(user, password, host, port, db)

        con = sqlalchemy.create_engine(url, client_encoding='utf8')

        meta = sqlalchemy.MetaData(bind=con, reflect=True)

        return con, meta


con, meta = connect('generic_admin', 'gohokies1!', 'generic_admin_test')
DeclarativeBase.metadata.create_all(con) #will automatically create the users table based on subclasses
db_session = sessionmaker(bind=con)
Since this file includes a large part of our auth token logic, let’s break it down. In particular, let’s look at ‘encode_auth_token’ and ‘decode_auth_token’. We see that we’re using a library called jwt, which is essentially our tool for creating an auth token, and also reading an auth token that was encrypted using the JSON web token protocol. You can read up more on the github page for pyJWT, but for now, the most important aspect is the fact that one of the parameters to the method for creating the auth token is a secret string. This string is how you recognize that your server is the one which created the token. To generate this string the following command should suffice:
echo $(head -c 32 /dev/urandom | base64 | head -c 32)
and then paste it into the
After that, everything should be good to import into our server.py file. Let’s move on to that!
4. Sign Up
Sign up is a relatively easy part of the user system, since all it is doing is encrypting a password and storing it in the database. Let’s check out what I mean:
from flask import Flask, request, jsonify, make_response
import bcrypt
import uuid, OpenSSL
import os
import sys
import time
from datetime import datetime, timedelta
from sqlalchemy import Column, ForeignKey, Integer, String
from sqlalchemy.ext.declarative import declarative_base
from sqlalchemy.orm import relationship
from sqlalchemy import create_engine
from sqlalchemy.orm import sessionmaker
import sqlalchemy
from functools import wraps

from models import *
app = Flask(__name__)


def process_user(credentials):

        session = db_session()
        first_name = credentials['firstName']
        last_name = credentials['lastName']
        email = credentials['email']
        phone = credentials['phone']
        password = credentials['password'].encode('UTF_8')
        salt = bcrypt.gensalt()
        password_hashed = bcrypt.hashpw(password, salt)
        user = Users(first_name, last_name, email, phone, password_hashed)
        try:
                session.add(user)
                session.commit()
                session.refresh(user) #needed because session.commit() erases object internal state see docs
        except Exception as e:
                session.rollback()
                print e
                return None
        finally:
                session.close()
        return user

@app.route('/signup', methods=['POST'])
def signup():
    content = request.get_json()
    user = process_user(content)

    if user is not None:
        return jsonify(firstName=user.first_name,
                lastName=user.last_name,
                email=user.email,
                phone=user.phone)
    else:
        return 'user creation failed', 500


if __name__ == "__main__":
    app.run(host='0.0.0.0')
Essentially the only thing that should look different here to everyone who has done the flask tutorials is the following:
password = credentials['password'].encode('UTF_8')
salt = bcrypt.gensalt()
password_hashed = bcrypt.hashpw(password, salt)
As mentioned before, bcrypt is the tool which takes a password, and turns it into something an attacker can’t decrypt even if they take control of the database. AND, when you want to see if a user has an account on login, all you have to do is hash with bcrypt and compare the two encrypted strings. Fortunately, bcrypt handles adding on “salt” which is another word for extra characters to increase the complexity of what is stored in the database to prevent a brute force approach of guessing all possible encryptions.
Take a moment to look over the rest of the sign up and ask a leader at the meetup for help if you don’t understand something.
5. Login
Ah, so you made it, congrats! The piece de le resistance for our user system is the login functionality. It is arguably the most complex part so be sure to brace yourself before continuing.
Recall that the login is meant to respond with an auth token. Thus, in the login, it has to not only check that the user is in the database, and that the password is correct, but then it also needs to respond with an auth token to the app, so that we know that this specific user is requesting other resources later on. Let’s get right into the code:
@app.route('/login', methods=['POST'])
def login():
    content = request.get_json()
    print content
    if content is not None:
        user_email = content['email']
        user_pass = content['password'].encode('UTF_8')
        session = db_session()
        user = session.query(Users).filter_by(email=user_email).first()
        if user is None:
            return 'no user found with email and password', 401
        if bcrypt.hashpw(user_pass, user.password.encode('UTF_8')) != user.password:
            return 'wrong password', 401

        auth_token = user.encode_auth_token(user_email)
        if auth_token is None:
            return 'auth generation failed', 500

        resp = make_response(jsonify(firstName=user.first_name,
                        lastName=user.last_name,
                        email=user.email,
                        phone=user.phone,
                        authToken=auth_token.decode()),
                    200)

        session.close()

        return resp
    else:
        return 'no credentials in body provided', 401
Now let’s break down this code. First we make sure to see if there is actually a user in the database ‘if user is None’. Once we have the user from the database, we check the encrypted password with the password sent from the client (after transforming the sent one). If it turns out the username and password was correct, then we access that user object’s ‘encode_auth_token’ method to generate a token based on the user’s email. Since this goes to our model code which ‘mixes in’ your secret key, we could put anything in the token that we would want to access later on. In this way, the token can be used to see which user that token was generated for in case we want to restrict certain resources to certain users.
Finally, we package the auth token into a response and ship it back to the user. Ok, so that wasn’t as bad as I made it out to be, sorry.
6. Checking the Auth
The final portion of this tutorial is to write a method that checks if a request to the server includes the auth token in the header cookie of the request. In other words, we want to validate the auth token for users who want to access resources from the database. How do we do this? Let’s see how it’s done for a GET request route for user profiles:
def validate_auth_token():
    if 'Authorization' in request.headers:
        auth_token = request.headers['Authorization']
        print auth_token
        try:
            session = db_session()
            payload = jwt.decode(auth_token, "<YOUR SECRET KEY GOES HERE>")
            if payload is None or 'sub' not in payload:
                return False
            user_email = payload['sub']
            user = session.query(Users).filter_by(email=user_email).first()
            if user is None:
                return 'Unrecognized token, please login again', 401
        except jwt.ExpiredSignatureError:
            return 'Signature expired. Please log in again.', 401
        except jwt.InvalidTokenError:
            return 'Invalid token. Please log in again.', 401
    else:
        return 'no authorization provided in header fields', 401
def login_check(route_func):
    """
    checks that the cookie header contains user session id
    """
    @wraps(route_func)
    def decorated_function(*args, **kwargs):
        validation_error = validate_auth_token()
        if validation_error is not None:
            return validation_error
        return route_func(*args, **kwargs)
    return decorated_function


@app.route('/profile/<email>', methods=['GET'])
@login_check
def profile(email):
    session = db_session()
    user = session.query(Users).filter_by(email=email).first()
    if user is None:
        return 'no user found by that email', 404
    return jsonify(firstName=user.first_name,
            lastName=user.last_name,
            email=user.email,
            phone=user.phone)
First off let’s just look at the following bit:
@app.route('/profile/<email>', methods=['GET'])
@login_check
def profile(email):
    session = db_session()
    user = session.query(Users).filter_by(email=email).first()
    if user is None:
        return 'no user found by that email', 404
    return jsonify(firstName=user.first_name,
            lastName=user.last_name,
            email=user.email,
            phone=user.phone)
This is just a route with ‘@login_check’ decorator, so this is how we would call ‘login_check’ to handle determining if this request is from someone with a valid auth token. Now let’s look at the rest:
def validate_auth_token():
    if 'Authorization' in request.headers:
        auth_token = request.headers['Authorization']
        print auth_token
        try:
            session = db_session()
            payload = jwt.decode(auth_token, "<YOUR SECRET KEY GOES HERE>")
            if payload is None or 'sub' not in payload:
                return False
            user_email = payload['sub']
            user = session.query(Users).filter_by(email=user_email).first()
            if user is None:
                return 'Unrecognized token, please login again', 401
        except jwt.ExpiredSignatureError:
            return 'Signature expired. Please log in again.', 401
        except jwt.InvalidTokenError:
            return 'Invalid token. Please log in again.', 401
    else:
        return 'no authorization provided in header fields', 401
def login_check(route_func):
    """
    checks that the cookie header contains user session id
    """
    @wraps(route_func)
    def decorated_function(*args, **kwargs):
        validation_error = validate_auth_token()
        if validation_error is not None:
            return validation_error
        return route_func(*args, **kwargs)
    return decorated_function
In this code break down, we’ll start with ‘login_check’ and we see a lot of python language decorator setup code. Ignore this. We call ‘validate_auth_token’ and check to ensure there was no validation error. If there is none, then the route function will get called as per how decorators behave. However, if there is a validation error, then that is because of the logic in ‘validate_auth_token’. Let’s break down that method. We first get the cookie header from the request made by the client. After that, we extract the auth token that the client is saying is valid. We use pyJWT to decode this auth token based on the JWT protocol. If this token has expired or is corrupted then jwt will throw an error. However, let’s say it’s good, now we can extract the user’s email from the auth token, and then the last step is to quickly check if that user is in the database. If it is, then we don’t return anything, and we let execution to continue.
And that’s it! KINDERSPIEL :^)
Good work making it this far! If you have any questions, always feel free to ask one of the club leaders during the meetup or by email.
If you’re interested in the security aspects of this project, I encourage you to explore that by getting involved in the security research at VT.
Appendix:
**You should always worry if you’re in the position of maintaining a secure system. I personally can’t think of one truly secure system in todays world that cannot be exploited by some present or future device. I’ll give you an example: it’s been proven possible that you can put a mobile phone inside a bank vault, and have it run an app that continuously prints a secret word to a log, and an attacker can model the latent heat signature of the device to know what secret word is being printed to the log with only sensors set up OUTSIDE OF THE VAULT. Absolutely insane.. Also, you should consider many cryptographic solutions to be weak given future advances in quantum computing. Overall, it is your responsibility as a developer to own the risks associated with your code.
***There’s a ton of exploits for a relatively out of the box solution that we’ll be describing today. If anything, this solution is just a mild deterrant. However, you would want to implement the full spec of OAUTH 2.0 or find an existing implementation. This tutorial is meant to give folks a good understanding of the high level behavior. See https://oauth.net/2/ for additional info.